2023. 7. 12. 11:39ㆍ카테고리 없음
설명
[들어가며]
최근에 Node.js + Vue.js로 회사에서 작업을 진행해서 간단하게 프로젝트에서 사용한 TIP 같은 것을 정리합니다.
상세한 지식을 작성하기에는 배움이 모자라므로 어디까지나 참고만 하시고, 제대로 배우고 싶으신 분은 공식 문서를 보시는 것을 추천합니다.
이 글은 어디까지나 수박 겉핥기처럼 간단한 내용만을 담고 있습니다.
[환경]
- OS : Windows 10
- Node.js : 10.16.3 LTS
- Vue.js : 2.X
- Editor : Visual Studio Code
우선 Node.js와 Visual Studio Code를 설치하도록 하겠습니다.
▶Node.js 설치
Node.js 다운로드
1. https://nodejs.org/ko 접속
Node.js
Node.js® is a JavaScript runtime built on Chrome's V8 JavaScript engine.
nodejs.org

2. [LTS] 버전을 클릭하여 설치. (현재는 12가 최대 LTS 버전이다. 12로 설치해도 문제 없습니다.)
Node.js 버전 확인 및 REPL 동작 확인
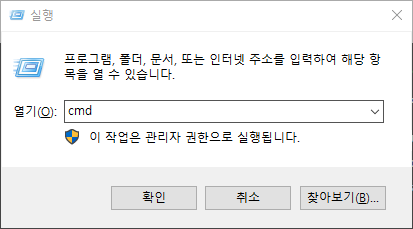
1. 설치 후에 [Window + R] 단축키 또는 윈도우에서 cmd를 입력 후 실행 (명령 프롬프트).

2. (1) Node.js 버전 확인. node -v 입력 후 엔터. 다운로드한 버전이 표시되면 정상적으로 설치 완료.
3. (2) node 를 입력 후 엔터를 입력하면 REPL(Read Eval Print Loop)에 진입.
4. 아래의 코드를 입력 후 엔터.
console.log("Hello World");5. 결과를 확인.
6. [Ctrl + C] 단축키를 연속으로 입력하여 REPL 종료.
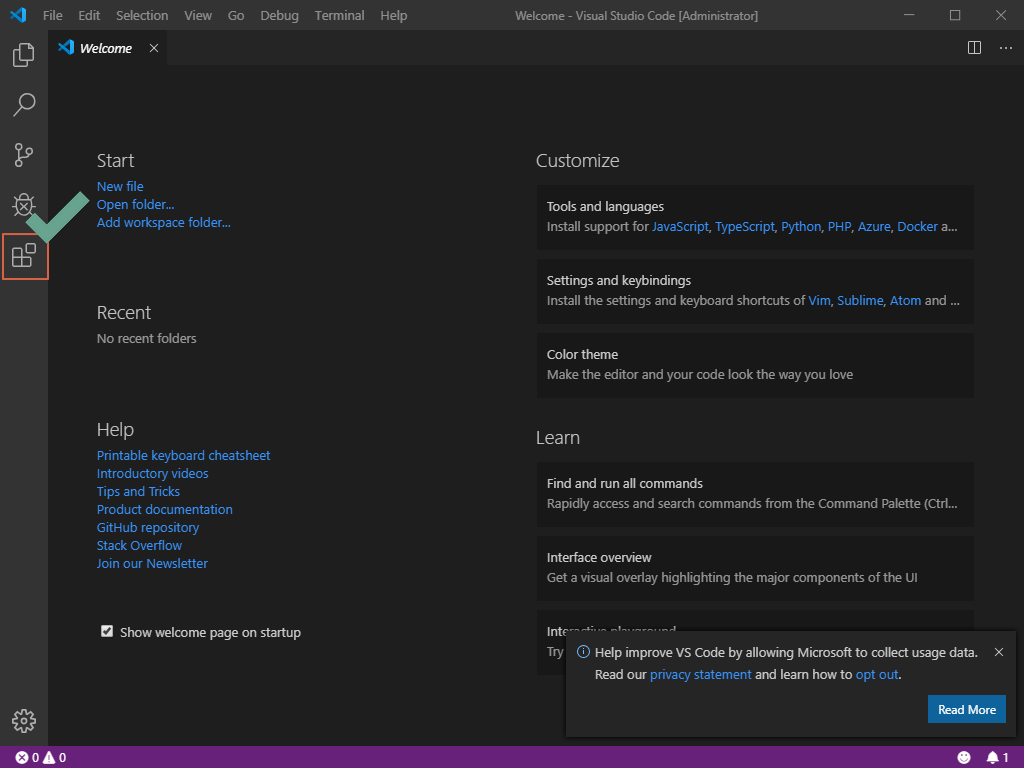
▶Visual Studio Code 설치
Visual Studio Code 다운로드
1. https://code.visualstudio.com 접속
Visual Studio Code - Code Editing. Redefined
Visual Studio Code is a code editor redefined and optimized for building and debugging modern web and cloud applications. Visual Studio Code is free and available on your favorite platform - Linux, macOS, and Windows.
code.visualstudio.com

2. [Download for Windows]를 클릭하여 설치.
확장 프로그램 설치
Visual Studio Code에서 유용한 확장 프로그램을 설치하도록 하겠습니다.
1. [Extensions]를 클릭하거나, [Ctrl + Shift + X] 단축키 입력.

2. (1) [Node.js]를 검색, [Node.js Modules Intellisense] (2)설치.

3. (1) [vue]를 검색, [Vuetur] (2)설치.
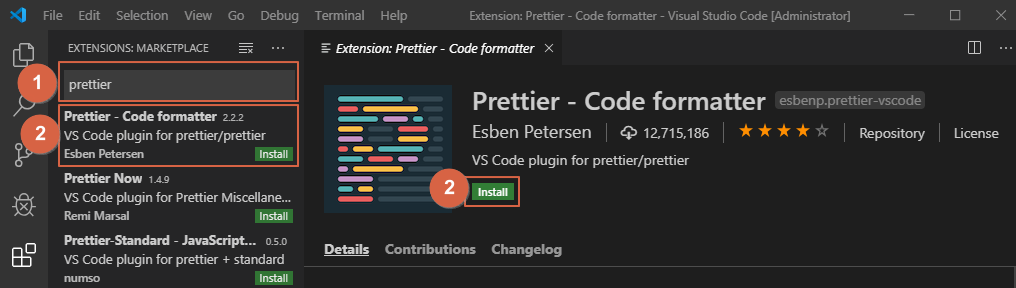
4. (1) [prettier]를 검색, [Prettier - Code formatter] (2)설치.

5. (1) [project]를 검색, [Project Manager] (2)설치.

6. 선택 사항 - (1) [sublime]]를 검색, [Sublime Text Key] (2)설치.
(저는 subliem text와 atom를 많이 사용했는데, 멀티 라인은 sublime text가 좀 더 편해서 sublime text 단축키를 사용하기 위해 설치했습니다.)
Prettier 저장 시마다 동작하도록 설정
코드 포맷을 잡아주는 Prettier를 저장할 떄마다 동작하도록 하려면 아래와 같은 방법으로 설정하면 됩니다.
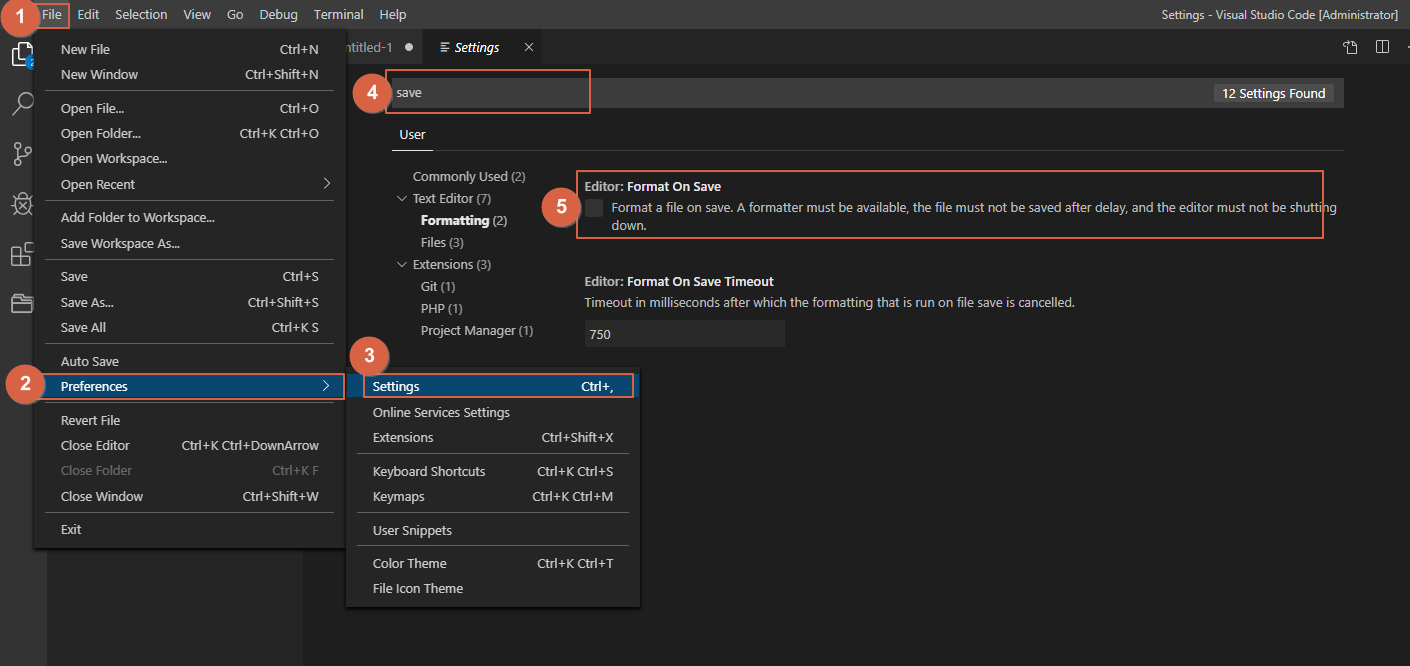
1. [File]
2. [Preferences]
3. [Settings]
4. [save] 검색
5. [Editor: Format On Save] 체크
Visual Studio 프로젝트 저장
작업할 때마다 매번 폴더 열기를 번거로우므로, 이제 프로젝트를 저장하도록 하겠습니다.
폴더 열기

1. (1) [Explorer] 클릭하거나, [Ctrl + Shfit + E] 단축키 입력
2. (2) [Open Folder] 클릭.
(상단에 [File] > [Open Folder]를 클릭 또는 [Ctrl + K Ctrl + O] 단축키를 입력하는 방법도 있습니다.
3. 작업하실 폴더를 열어주세요. (저는 Vue.js라는 폴더로 생성하였습니다.)
프로젝트 저장
현재 열려 있는 폴더를 프로젝트로 저장하는 방법입니다.
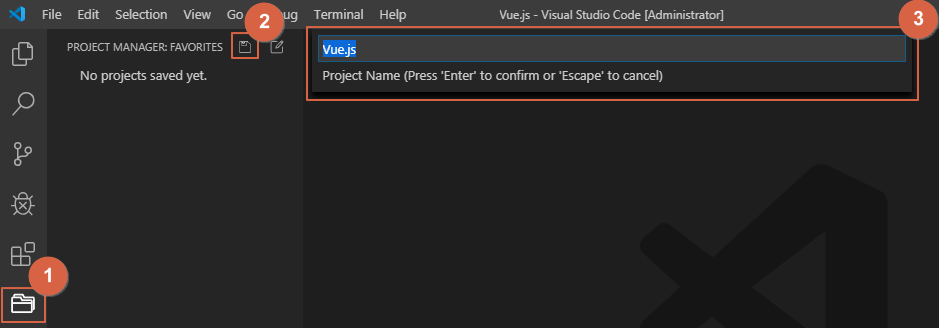
1. (1) [Project Manager] 클릭.
2. (2) [Project Manager: Save Project] 클릭.
3. (3) [프로젝트 이름](기본적으로 현재 폴더 이름) 입력 후 엔터.
([Ctrl + Shift + P] 단축키를 입력 후 [Save Project]를 검색하여 저장하는 방법도 있습니다.])
프로젝트 열기
이제 저장한 프로젝트를 여는 방법입니다.

1. (1) [Project Manager] 클릭.
2. (2) [프로젝트 이름] 클릭.
Visual Studio 디버그 테스트(Debug Test)
Node.js를 디버그(Debug)하는 방법을 알아보도록 하겠습니다.
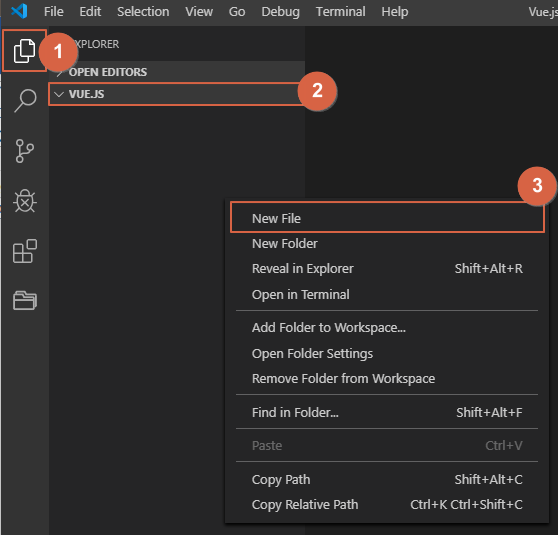
1. (1) [Explorer] 클릭하거나, [Ctrl + Shfit + E] 단축키 입력.
2. (2) 현재 폴더에 우측 클릭 후 (3)[New File] 클릭.

3. app.js라는 파일 생성 후 아래의 코드 입력.
console.log("Hello World");

4. [F5] 단축키를 입력하여 디버그 모드 실행.
5. 하단 [DEBUG CONSOLE]에 결과가 나오면 성공.
디버그 오류
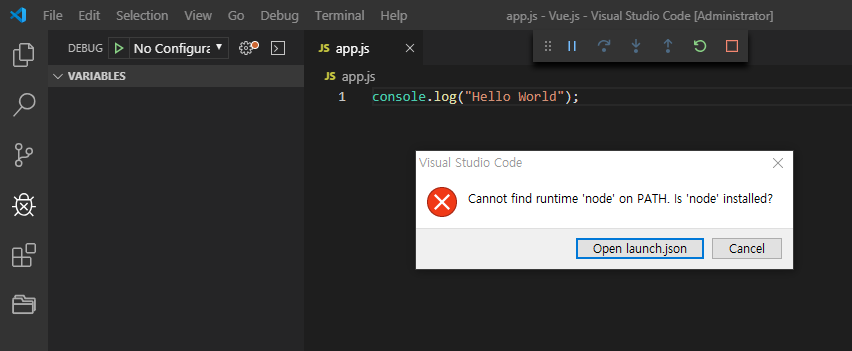
위와 같은 오류가 발생하면 PC를 재부팅 후에 재시도.